Self-service checkouts can feel confusing if you have never used one before.
The screen may ask you questions, the machine may tell you to put an item in the bagging area, and sometimes it suddenly asks you to wait for a member of staff.
The good news is that you do not need to know everything before you start. The checkout normally guides you through the process one step at a time.
In this simple guide, we’ll explain how to use a supermarket self-service checkout from start to finish, including what to do if something goes wrong.
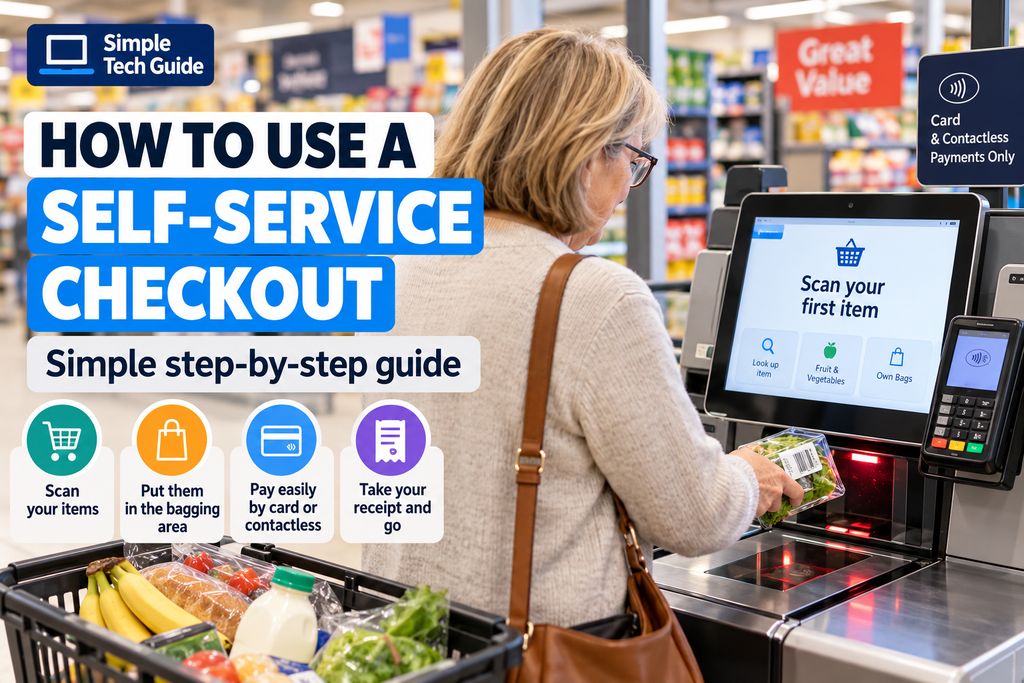
Quick answer: Take one item at a time, scan its barcode, place it in the bagging area, and repeat. When you have finished scanning, choose Finish and Pay or Pay, select your payment method, pay, take your receipt if you want one, and collect your shopping.
Important: Self-service checkouts vary between supermarkets and stores. The buttons and wording on the screen may look slightly different, but the basic process is usually very similar.
On this page
- Before You Start
- 1. Start the Checkout
- 2. Scan Your First Item
- 3. Put the Item in the Bagging Area
- 4. Continue Scanning Your Shopping
- 5. How to Buy Fruit and Vegetables
- 6. What If an Item Will Not Scan?
- 7. What Does “Unexpected Item in Bagging Area” Mean?
- 8. What Happens With Age-Restricted Items?
- 9. Using a Loyalty Card
- 10. How to Pay
- 11. Take Your Shopping and Receipt
- What If I Get Stuck?
- Common Self-Service Checkout Questions
Before You Start {#before-you-start}
Before choosing a self-service checkout, have a quick look at the machine.
Some checkouts are card or contactless only, while others may also accept cash. There is usually a sign or message telling you which payment methods are accepted.
You may also see different types of checkout:
- A small checkout with a bagging area, usually intended for baskets.
- A larger self-service checkout with more space for bigger shops.
- A scan-as-you-shop checkout for customers who have scanned items while walking around the store.
For your first attempt, a normal basket self-service checkout with only a few items is often the simplest place to start.
1. Start the Checkout {#start-the-checkout}
Walk up to an available checkout.
The screen may already display a message such as:
Start
Touch screen to begin
or
Scan your first item
Some machines simply start automatically when you scan your first product.
You may also be asked whether you are using your own bags.
If you’re unsure, don’t worry. Read the message on the screen and choose the option that best describes what you’re doing.
2. Scan Your First Item {#scan-your-first-item}
Pick up one item.
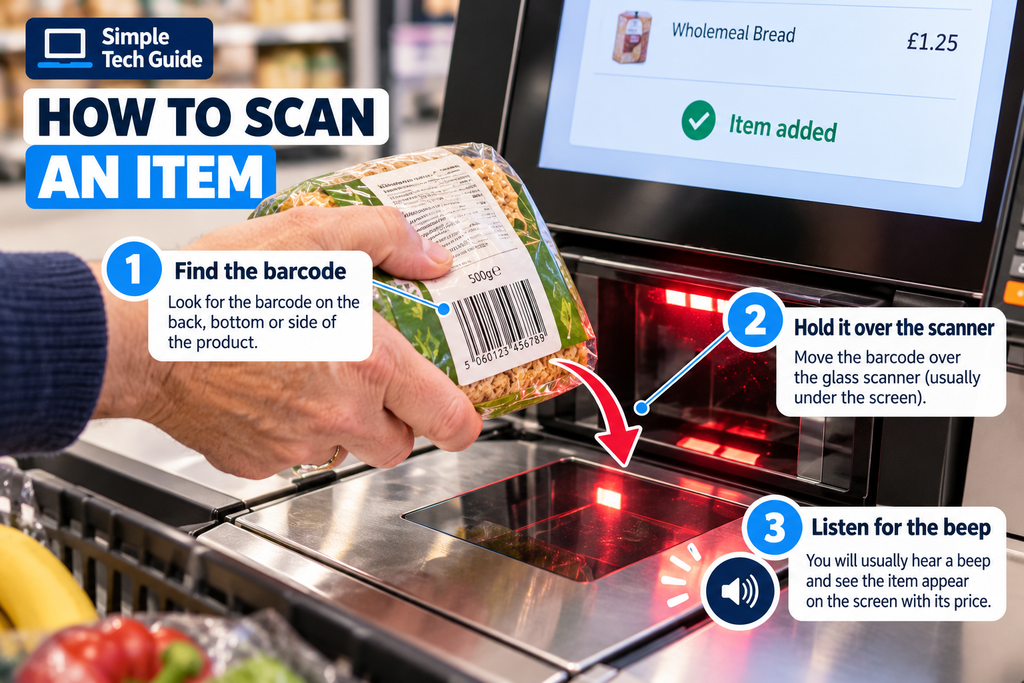
Look for its barcode. This is the small rectangle made up of black lines, usually found on the back, bottom or side of the packaging.
Move the barcode over the scanner.
The scanner is normally the glass panel underneath or beside the screen.
You will usually hear a beep when the barcode has been successfully read.
The item should then appear on the screen with its price.
No beep?
Don’t keep waving the item quickly backwards and forwards.
Try:
- holding the barcode flat over the scanner;
- moving it slightly closer or further away;
- turning the product around;
- checking that you’re scanning the actual barcode rather than another code on the packaging.
If it still doesn’t work, you can ask a member of staff for help.
3. Put the Item in the Bagging Area {#bagging-area}
After the item has scanned, put it in the bagging area.
This is important.
Many self-service checkouts use the bagging area to check that the item you’ve just scanned has been put down.
If you’re using a shopping bag, you can usually place the item directly into your bag once the machine is ready for it.
Then pick up your next item.
A simple rhythm is:
Pick up → Scan → Beep → Put down → Next item
Beginner tip
Try not to pick up several products at once. Doing one item at a time makes the checkout much easier to follow.
4. Continue Scanning Your Shopping {#continue-scanning}
Repeat the same process for each item:
1. Pick up one item.
2. Find the barcode.
3. Scan it.
4. Check that it appears on the screen.
5. Put it in the bagging area.
Don’t worry about being fast.
There is no need to keep up with an experienced shopper at the next checkout. Take your time and watch what appears on your own screen.
5. How to Buy Fruit and Vegetables {#fruit-and-vegetables}
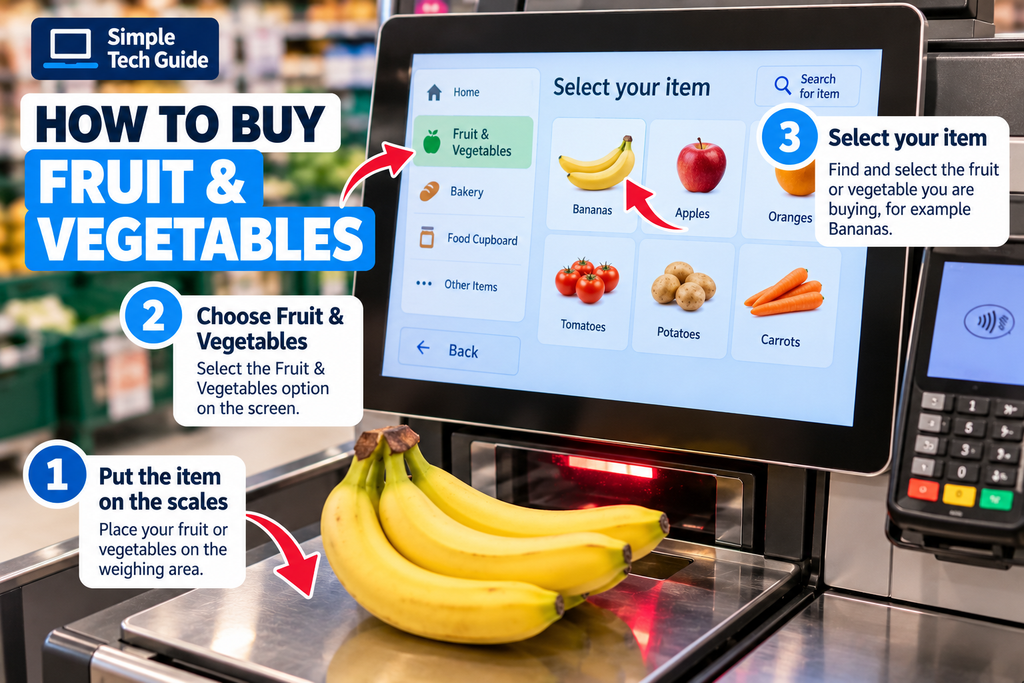
Loose fruit and vegetables can work differently because they may not have a barcode.
You may need to place the produce on the checkout scales and select something such as:
Fruit & Vegetables
Fresh Produce
or
Look Up Item
You can then find the product on the screen.
For example, if you’re buying loose bananas, select Bananas.
The checkout weighs them and calculates the price.
Some supermarkets weigh or label loose produce elsewhere in the store instead, so follow the instructions shown on the machine.
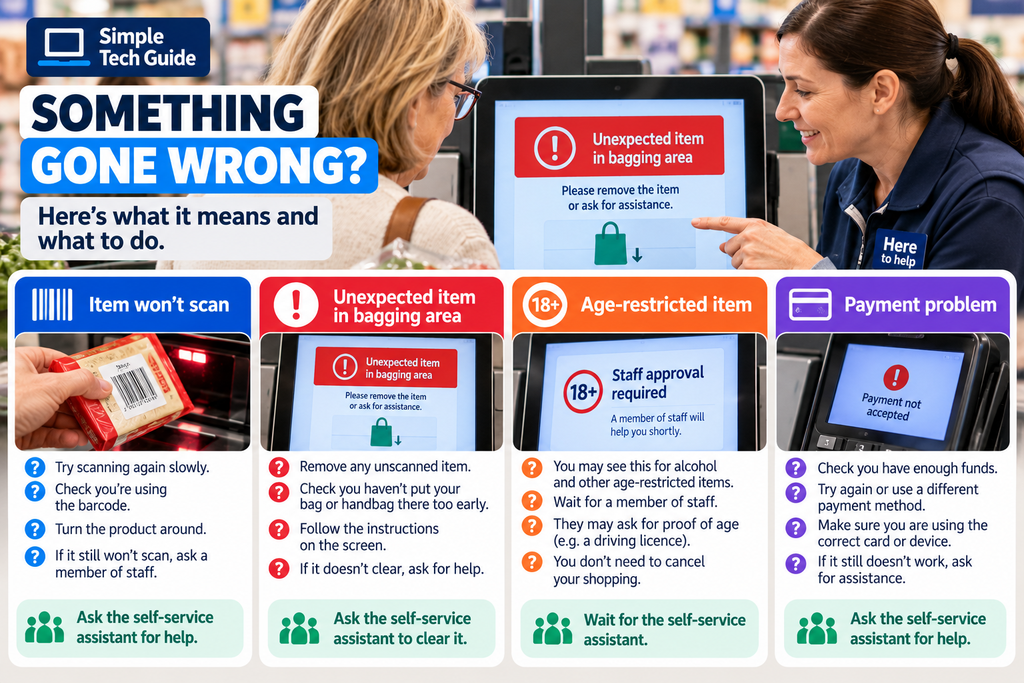
6. What If an Item Will Not Scan? {#item-will-not-scan}
This happens frequently and doesn’t mean you’re doing anything wrong.
First, try scanning the barcode again slowly.
If that doesn’t work, look at the screen. There may be an option to search for the product or request assistance.
A member of staff can usually enter or scan the item for you.
Don’t scan another copy of the product just to make the machine accept it unless you’re actually buying both items. You could accidentally charge yourself twice.
7. What Does “Unexpected Item in Bagging Area” Mean? {#unexpected-item}
This is one of the messages that can make self-service checkouts seem more complicated than they really are.
You may hear something similar to:
Unexpected item in bagging area.
It generally means the checkout has detected something in the bagging area that it wasn’t expecting.
For example, you might have:
- put your handbag there;
- placed an unscanned item down;
- moved an item after scanning it;
- added your shopping bag before the machine was ready;
- leaned against the bagging area.
Look at the screen and follow its instructions.
If the message doesn’t disappear, ask the self-service checkout assistant. They can normally clear it quickly.
8. What Happens With Age-Restricted Items? {#age-restricted-items}
Some products require staff approval before you can buy them.
Examples can include alcohol and certain other age-restricted products.
Scan the product normally.
The checkout may then display a message telling you that staff approval is required.
You don’t need to cancel your shopping.
Wait for a member of staff. They can approve the sale if appropriate and may ask for proof of age.
9. Using a Loyalty Card {#loyalty-card}
If you have the supermarket’s loyalty card or app, the checkout will normally give you an opportunity to scan it.
Your loyalty card may have a barcode or QR code.
If you’re using an app, open the relevant loyalty card on your phone and hold its code over the scanner.
The checkout should confirm when it has been accepted.
If you don’t have a loyalty card, you can normally continue without one.
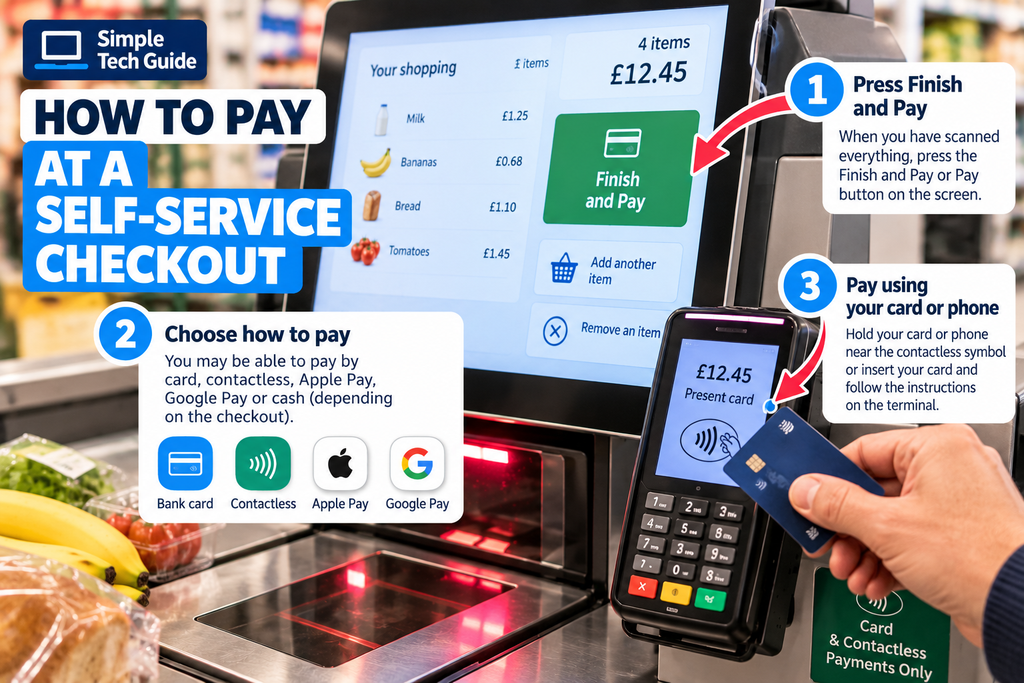
10. How to Pay at a Self-Service Checkout {#how-to-pay}
Once you’ve scanned everything, check that you haven’t left anything in your basket.
Then look for a button such as:
Finish and Pay
Pay
or
Go to Payment
Press it.
The machine may ask how you want to pay.
Depending on the checkout, options might include:
- debit or credit card;
- contactless card;
- Apple Pay or Google Pay;
- cash, if that particular machine accepts it;
- gift card or another supported payment method.
Paying by contactless card
Look for the contactless symbol on the card reader.
Hold your card close to the reader and wait.
Don’t immediately pull it away. Wait until the terminal confirms that the payment has been accepted.
Paying with a bank card and PIN
Insert your card into the card reader if instructed.
Follow the instructions on the card terminal and enter your PIN if requested.
Never tell anyone your PIN or allow a stranger to enter it for you.
11. Take Your Shopping and Receipt {#finish}
Wait until the checkout confirms that your payment has been accepted.
You may be asked:
Would you like a receipt?
Choose Yes or No.
If you choose Yes, take the receipt when it prints.
Before leaving, check:
- you’ve collected all your bags;
- nothing is still in your basket;
- you’ve taken your bank card if you inserted it;
- you’ve taken your receipt if you requested one;
- you’ve collected any change if you paid with cash.
That’s it — you’ve used a self-service checkout.
What If I Get Stuck? {#getting-help}
Ask for help.
Self-service checkout areas normally have members of staff nearby because some situations require staff assistance.
You might need them because:
- an item won’t scan;
- the checkout doesn’t recognise something in the bagging area;
- you’ve scanned something twice;
- you want to remove an item;
- an age-restricted product needs approval;
- your payment isn’t working;
- you simply aren’t sure what the machine wants you to do.
You are not expected to fix the machine yourself.
If you’re unsure, stop and ask the assistant rather than repeatedly pressing different buttons.
Common Self-Service Checkout Questions {#questions}
Do I have to use a self-service checkout?
This depends on the store and what staffed checkouts are available. If you would prefer assistance, look for a staffed checkout or ask a member of staff what options are available.
What is the bagging area?
It’s the area beside the scanner where you place your shopping after you’ve scanned it. Some machines monitor this area as part of the checkout process.
Why does the checkout keep saying “unexpected item”?
The machine has detected something in the bagging area that doesn’t match what it expected. Check the screen for instructions or ask the checkout assistant to help.
What if I scan something twice?
Don’t pay for it twice. Look for an option to remove the extra item or ask the checkout assistant to remove it for you.
Can I use cash?
Some self-service checkouts accept cash and others are card-only. Look for a sign on the checkout or check the payment options displayed on the screen.
Can I use contactless?
Many self-service checkouts accept contactless payments. Look for the contactless symbol on the card reader.
Can I use my phone to pay?
If the checkout accepts contactless payments and your phone has a compatible payment service set up, you may be able to pay using your phone. Follow the instructions on the payment terminal.
What happens if my card is declined?
Don’t keep trying repeatedly if you’re unsure why it failed. You can try another available payment method or ask a member of staff for assistance. A declined payment doesn’t necessarily mean there is something wrong with the checkout.
Remember: You Don’t Need to Rush
The most important thing to remember when using a self-service checkout is that you can take your time.
For most shopping, the process is simply:
Scan one item → put it down → scan the next item → press Pay → pay.
If the machine asks for something you don’t understand, read the message once more. If you’re still unsure, ask the checkout assistant.
After you’ve used a self-service checkout a couple of times, the process will usually feel much more familiar.
More Simple Help When You’re Out & About
Technology is increasingly part of shopping, parking, travelling and everyday services.
Our Out & About Tech guides explain these systems in straightforward language, one step at a time.
Coming next:
🚗 How to Use a Car Park Payment Machine
📱 How to Pay for Parking With Your Phone
📷 How to Scan a QR Code With Your Phone
💳 How to Use Contactless Payments
🚆 How to Use a Train Ticket Machine